
Quick Start
This guide will quickly take you through how to initialize, create, and deploy your subgraph on:
Subgraph Studio - used only for subgraphs that index Ethereum mainnet
Hosted Service - used for subgraphs that index other networks outside of Ethereum mainnnet (e.g. Binance, Matic, etc)
Subgraph Studio
1. Install the Graph CLI
The Graph CLI is written in JavaScript and you will need to have either npm or yarn installed to use it.
# NPM$ npm install -g @graphprotocol/graph-cli
# Yarn$ yarn global add @graphprotocol/graph-cli2. Initialize your Subgraph
Initialize your subgraph from an existing contract.
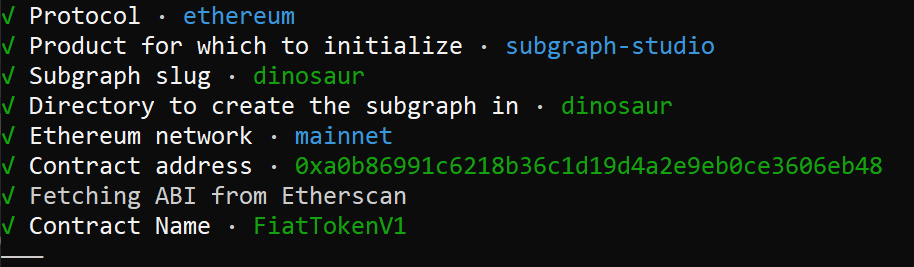
graph init --studio <SUBGRAPH_SLUG>Your subgraph slug is an identifier for your subgraph. The CLI tool will walk you through the steps for creating a subgraph, such as contract address, network, etc as you can see in the screenshot below.
3. Write your Subgraph
The previous commands create a scaffold subgraph that you can use as a starting point for building your subgraph. When making changes to the subgraph, you will mainly work with three files:
Manifest (subgraph.yaml) - The manifest defines what datasources your subgraphs will index.
Schema (schema.graphql) - The GraphQL schema defines what data you wish to retreive from the subgraph.
AssemblyScript Mappings (mapping.ts) - This is the code that translates data from your datasources to the entities defined in the schema.
For more information on how to write your subgraph, see Create a Subgraph.
4. Deploy to the Subgraph Studio
Go to the Subgraph Studio https://thegraph.com/studio/ and connect your wallet.
Click "Create" and enter the subgraph slug you used in step 2.
Run these commands in the subgraph folder
Authenticate and deploy your subgraph. The deploy key can be found on the Subgraph page in Subgraph Studio.
You will be asked for a version label. It's strongly recommended to use the following conventions for naming your versions. Example:
0.0.1,v1,version1
5. Check your logs
The logs should tell you if there are any errors. If your subgraph is failing, you can query the subgraph health by using the GraphiQL Playground. Use this endpoint. Note that you can leverage the query below and input your deployment ID for your subgraph. In this case, Qm... is the deployment ID (which can be located on the Subgraph page under Details). The query below will tell you when a subgraph fails so you can debug accordingly:
6. Query your Subgraph
You can now query your subgraph by following these instructions. You can query from your dApp if you don't have your API key via the free, rate-limited temporary query URL that can be used for development and staging. You can read the additional instructions for how to query a subgraph from a frontend application here.
Hosted Service
1. Install the Graph CLI
"The Graph CLI is an npm package and you will need npm or yarn installed to use it.
2. Initialize your Subgraph
Initialize your subgraph from an existing contract.
You will be asked for a subgraph name. The format is
<Github>/<Subgraph Name>. Ex:graphprotocol/examplesubgraphIf you'd like to initialize from an example, run the command below:
In the case of the example, the subgraph is based on the Gravity contract by Dani Grant that manages user avatars and emits
NewGravatarorUpdateGravatarevents whenever avatars are created or updated.
3. Write your Subgraph
The previous command will have created a scaffold from where you can build your subgraph. When making changes to the subgraph, you will mainly work with three files:
Manifest (subgraph.yaml) - The manifest defines what datasources your subgraph will index
Schema (schema.graphql) - The GraphQL schema define what data you wish to retrieve from the subgraph
AssemblyScript Mappings (mapping.ts) - This is the code that translates data from your datasources to the entities defined in the schema
For more information on how to write your subgraph, see Create a Subgraph.
4. Deploy your Subgraph
Sign into the Hosted Service using your GitHub account
Click Add Subgraph and fill out the required information. Use the same subgraph name as in step 2.
Run
codegenin the subgraph folder
Add your Access token and deploy your subgraph. The access token is found on your dashboard in the Hosted Service.
5. Check your logs
The logs should tell you if there are any errors. If your subgraph is failing, you can query the subgraph health by using the GraphiQL Playground. Use this endpoint. Note that you can leverage the query below and input your deployment ID for your subgraph. In this case, Qm... is the deployment ID (which can be located on the Subgraph page under Details). The query below will tell you when a subgraph fails so you can debug accordingly:
6. Query your Subgraph
Follow these instructions to query your subgraph on the Hosted Service.
Last updated